
Synology NAS: How QuickConnect Works
With QuickConnect, you can access your Synology NAS over the Internet without any complicated network settings or port sharing. You can read how to do this in this guide.
Synology NAS: set up QuickConnect - how it works
First, enable access for QuickConnect on your Synolgy NAS:
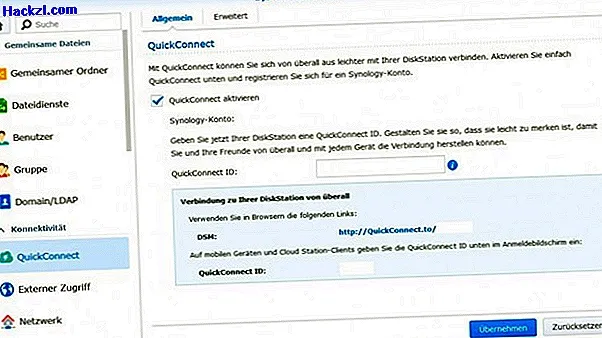
- Log in to your NAS with the Synology password and navigate to "Control Panel"> "QuickConnect".
- Then click "Sign in to a Synology Account or Register an Account". Either log in with your existing account or create a new user account.
- Enter your desired ID in the "QuickConnect-ID" field. This can consist of numbers, dashes and letters. The ID must start with a letter. Choose an ID that you can easily remember and then confirm your entry with "Apply".
- You will then receive your personal QuickConnect URL in the form of //Quickconnect.to/YourID. Use this link to access your NAS over the Internet.
- If you do not see the link immediately, click on "Advanced" and tick "DSM" in the next window to activate this service.
Synology NAS: Optimize access via QuickConnect
Use the following options to adapt access to different network environments:
- Navigate to Control Panel> QuickConnect> Advanced.
- Select "Enable QuickConnect Relay Service". This means that the connection is transferred via the Synology Relay server if direct access via QuickConnect is not possible in the current network environment.
- Also check the box "Automatically create port forwarding rules". If you use your Synology NAS with a UPnP-enabled router, it will automatically be instructed to create rules for port forwarding for QuickConnect.
- In this area you also determine which applications you want to share with QuickConnect.

The next practical tip will tell you how to set up a WebDAV server on Synology NAS.