
T-Online: Activate SSL encryption
This practical tip shows you in just a few steps how to activate the SSL encryption of your T-Online email account.
T-Online: Set SSL encryption in Outlook
We'll explain how to encrypt your Outlook 2010 account here. In the picture gallery you can follow the instructions step by step.
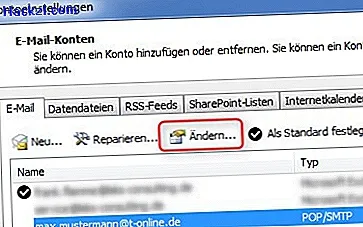
- Start Outlook 2010 and open the account settings via File - Information.
- Select your mailbox from the list and click the "Change" button.
- Here you have to change the server information. You can read how to do this in the next paragraph.
Change server information in Outlook 2010
T-Online provides various incoming mail servers for checking the emails. Before you activate SSL, check here which server you are using and set the correct outgoing server. Below you will find an overview of the configurations:
- If you are using popmail.t-online.de as your incoming server, please change the outgoing server to smtpmail.t-online.de.
- If you are using pop.t-online.de as your incoming mail server, please change the incoming mail server to securepop.t-online.de and the outgoing server to securesmtp.t-online.de.
- If you use imapmail.t-online.de or imap.t-online.de as incoming mail server, please change the outgoing server to smtpmail.t-online.de.
- If you use securepop.t-online.de or secureimap.t-online.de as incoming mail server, no changes are necessary, since encryption is already activated for you.
Additional settings for SSL encryption
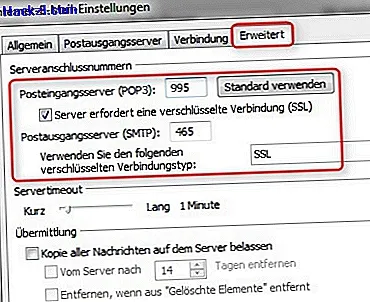
After you have checked the data of your incoming and outgoing server, click on the "Further settings" button and switch to the "Advanced" tab. Enter the following there:
- Incoming server (POP3): 995 or incoming server (IMAP): 993
- Outgoing mail server (SMTP): 465
- Check "Server requires an encrypted connection (SSL)"
- Connection type: SSL

Completion and test of the configuration
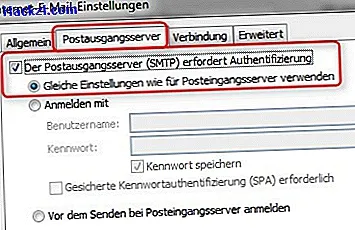
Now switch back to the "Outgoing server" tab:
- Activate the field "Outgoing mail server (SMTP) requires authentication".
- Select the setting "Use the same settings as for the incoming mail server" and confirm with "OK".
- Click on "Next" to test your configuration and exit the mail wizard with "Finish". Your account's SSL encryption is now active.
In another practical tip, we will show you how to activate SSL encryption in GMX Mail and set up SSL encryption for Apple Mail.
Latest videos
Open account settings in Outlook.

Select an account for the SSL changeover.
Click on "More Settings"

Under the "Advanced" tab you will find the SSL settings.
Authentication of the outgoing mail server with "Outgoing mail server.

Outlook automatically tests your SSL encryption
