
Set up TeamSpeak 3 server on Linux - how it works
Here we show you how to set up a TeamSpeak 3 server on your Linux V or root server.
Step 1: software download for server installation
If you want to set up a TeamSpeak 3 server, you need additional software. You can find these in our CHIP download area.
- WinSCP - for uploading and editing the TeamSpeak 3 server files on your V or root server.
- PuTTY - SSH client for command control of your TeamSpeak 3 server.
Step 2: preparing the Linux server
After downloading and installing the necessary software, the proper functioning of the TeamSpeak 3 server is ensured on your server. You have to prepare your server for this.
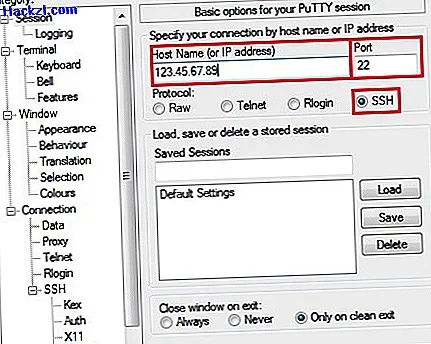
- Start "PuTTY" and enter the IP address of your server in the interface under "Hostname". Also check whether the value 22 is specified under "Port". Furthermore, the item "SSH" must be selected under "Protocol".
- Enter your user name (root) and the associated password and confirm your entries by clicking on "Open".
- After successful login, change to the main directory of your server with the command "cd / home".
- Now create a new folder in the main directory for setting up your TeamSpeak 3 server. Enter the command "mkdir teamspeak3" and confirm with the "Enter" key. Note: The name "teamspeak3" within the command is freely selectable. You can choose the name of the directory as you like.
- Use the "adduser teamspeak" command to create a new user with the name "teamspeak" and choose a corresponding password. Note: The name "teamspeak" within the command is freely selectable. You can choose the name of the user as you like.
- With the command "chown teamspeak / home / teamspeak3" you authorize the created user to start the TeamSpeak 3 server.
- Switch to the "teamspeak" user using the "su teamspeak" command and enter the appropriate password if necessary.
- Now minimize the application. You will need "PuTTY" again later.
Step 3: Download Linux Server files
To install the TeamSpeak 3 server, you need the appropriate installation file. You can find them on the TeamSpeak download page.
- Visit TeamSpeak.com and select "TeamSpeak 3" in the "Downloads" menu.
- Scroll to the "Linux" overview and click on the "Download" button behind "Server x86" (32-bit version). Note: Click the "Download" button behind "Server amd64" if you are using a 64-bit operating system.
- You will be asked to read the End User License Agreement. Then select "I agree" and finally "Submit" if you agree.
Step 4: Upload and unzip server files
Now you have the latest version for your server. With "WinSCP" you load them onto your V or root server.
- After starting "WinSCP", enter the IP address of your server in the "Computer name" field.
- Enter "root" again in the "User name" field and the corresponding root password in the "Password" field. Also make sure that 22 is in the Port Number field.
- With a click on "Register" or with the "Enter" key you start the session with your server.
- In the directory overview of the "WinSCP" interface, switch to the main directory "home" and then to the subdirectory "teamspeak3" (If necessary, the directory name you selected - see step 2, point 4).
- Now upload the previously downloaded TeamSpeak 3 server version to the "teamspeak3" subdirectory using "Drag & Drop".
- Extract the uploaded TeamSpeak 3 server version in "PuTTY" with the command "tar xfvz teamspeak3-server_linux-x86-3.0.10.3.tar.gz" (full name of the file). Note: You can use the "Tab" key to automatically complete file names.)
- Your Linux server automatically extracted the archive after entering the command. Change to the directory "teamspeak3-server_linux-x86" with the command "cd teamspeak3-server_linux-x86".

Step 5: Start TeamSpeak 3 server
After successfully unpacking the server, all you have to do is start it.
- Start your TeamSpeak 3 server with the command: "./ts3server_startscript.sh start". The setup is now successfully completed
- Important: During the first start-up of your server, you will be given some important data for later administration. You should make a note of this data. You cannot change it afterwards.
- Note: Setting up a TeamSpeak 3 server in the 64-bit server version takes place identically.
This practical tip was tested on a V-Server with Debian 7.0 in the 32-bit version. This practical tip shows you how to log in to TeamSpeak 3 as a server admin.
$config[ads_text5] not found