
Install Ubuntu on the PC - how it works
Ubuntu is one of the most user-friendly Linux operating systems. Installing Ubuntu on your PC will therefore be relatively easy for you.
Create an Ubuntu ISO image
- First you have to decide whether you want to install Ubuntu (64 bit) or Ubuntu (32 bit).
- After downloading the appropriate Linux version, create an ISO image. If you don't have a suitable burning program at hand, the CDBurnerXP may be interesting.
- Once you have installed the CDBurnerXP and then called it up, click on the "Burn ISO image" option.
- In the "Burn ISO image" menu, enter the appropriate Ubuntu file in the "Select ISO image to burn" field, modify the burn option to your liking and shoot with "Burn medium".
- If your PC can also be booted from a USB stick, we have the appropriate "ISO to USB" burning program for you.

Install the Linux operating system Ubuntu on the PC
Downloading the Linux OS and creating the boot DVD was basically the skin work. The installation of Ubuntu usually runs almost by itself.
- If you want to install Ubuntu together with Windows on a hard drive, this is easily possible. As a precaution, however, you should make a backup of your data. See the practical tip "Mirror hard drive - how it works" or the free program "Paragon Backup Recovery 2014".
- You should also make sure that you have at least 6.5 GB of free space on your hard drive.
- If all requirements are met, insert the freshly burned DVD into the drive and restart the PC.
- If the CD-ROM drive is not entered as the first boot option on your computer, modify the sequence in the BIOS accordingly.
- After the Linux DVD has started, you have to be patient for a moment and then you are already in the Ubuntu installation menu.
The Ubuntu installation menu
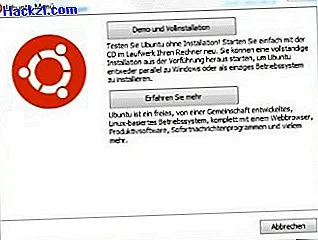
- First select the language and choose between the two options "Try Ubuntu" and "Install Ubuntu". If you choose the first option, you can run the installation later directly from the demo if you want. We choose the second option "Install Ubuntu".
- Under "radio network" you can download updates if you like. We opt for the first option "I don't want to connect to a wireless network now".
- In the next menu, you just confirm that you have enough space for Ubuntu on your hard drive and then it gets exciting.
- In the "Installation type" menu you have to make sure that you do not make any mistakes. This is especially true if you want to install Ubuntu for an existing Windows.
- The option that we immediately deactivate in this case is: "Replace Windows with Ubuntu". However, we opt for the "Install Ubuntu next to Windows" option. If you want to use Ubuntu as the sole operating system, you can of course have Windows replaced.
- If you want to install Ubuntu as a stand-alone OS, the Linux system prepares the partitioning of the hard disk in the next step. Then it continues as described under point 8.
- Otherwise, you still have the option to install Ubuntu in a separate partition or on a second hard drive.
- However, we wanted to "install Ubuntu next to Windows" and after this somewhat delicate menu item is done, we continue relaxed. The Linux operating system is installed and you choose your time zone and the appropriate keyboard layout.
- Finally, create a user account with computer and user names and a password. You have to remember the password well, because in future you will always have to specify if you want to change something in the system (as an admin password, under Linux this is required for root operations).
If you own a Chromebook, you don't have to do without Ubuntu. The practical tip "Install Ubuntu on the Chromebook - how it works" has the appropriate tips for you.