
Install Ubuntu on the Wii - Here's how
"How do you actually install Ubuntu on the Wii?" - At the latest since Nintendo discontinued support for the Nintendo Wii with the release of the Wii U, more and more Wii owners are wondering how the Wii could be used in other ways. In this practical tip we will show you how to turn your Nintendo Wii into a fast Linux PC.
Use Ubuntu on the Wii: You need this accessory
In order to use Ubuntu on the Wii, you need the following accessories.
- A USB keyboard.
- A USB stick with at least 4GB storage space.
- An SD card (or MicroSD card with adapter) with at least 4GB storage space.
Ubuntu for the Wii: the preparations
Before you install Ubuntu on the Wii, you need to do some preparation.
- Start your Wii and go to the "Wii Options" at the bottom left.
- Then click your way into the "Wii Settings".
- Then write down the version number on the top right. In our case it is "4.3E".
- Then scroll one page and click on "Internet".
- Then select "Console Information" and write down the Mac address of your Wii.
- Also make sure your Wii is connected to the internet via WiFi. You can then turn your Wii off again.
Nintendo Wii: LetterBomb
Next you need to download LetterBomb for the Wii.
- Go to the LetterBomb homepage and select your operating system version here.
- Then enter your Mac address and tick "Bundle the HackMii Installer for me!".
- Finally click on "Cut the red wire". Then a ZIP file is downloaded.
- Extract this ZIP file and select your SD card as the target folder. You should have previously formatted them with FAT32.
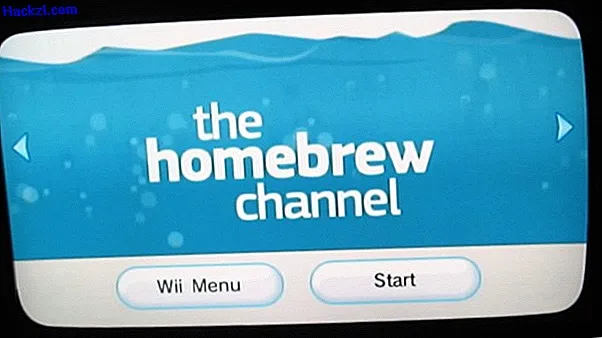
Install the homebrew channel on the Wii
Next, insert your SD card into the Wii and start it.
- At the bottom right you should see a new message in your inbox with a red envelope.
- Click the envelope with the A button on your Wiimote.
- Then press the "1" button on your Wii Remote.
- Use the arrow keys (on your Wiimote) to navigate to "Continue" and press "A".
- Then go to "Install The Homebrew Channel" and to "Yes, continue". Then the homebrew channel is installed.
- Then click again on "Continue" and on "Exit".
- Now the homebrew channel should start. Press the home button on your Wii Remote and click "Exit to System Menu". You can then turn your Wii off again.
Ubuntu for the Wii: You need these files
The next step is to find the right files for your Ubuntu installation.
- First you need an installer that can install a Linux kernel. At this point we use the "Whiite Linux Installer (Beta 1)", which you can download from the GameCube Linux homepage.
- Extract this installer and choose your SD card as the destination path. It is important that you have reformatted them with FAT32 beforehand.
- Next you need a suitable distribution. In this article, we list our top 10. The GC Linux download page and the WiiBrew homepage are very practical. We are using an Ubuntu distribution for the Wii at this point.
- Extract this file too and select your USB stick as the target path. This should also be completely empty and again formatted with FAT32.
Install Ubuntu on the Wii
After completing all of the above steps, you can now finally install Ubuntu on the Wii.
- Insert your SD card, USB stick and USB keyboard into your Wii and start it.
- Then open the homebrew channel, click on "whiite-linux Installer (B1)" and on "Load".
- Then use the arrow keys on your keyboard to navigate to "Yes" and press the Enter key.
- Then go back to "Yes", "OK" and "Yes" again. Ubuntu will now be installed. This process takes about two hours. After a short time, the screen saver activates and the screen goes black. To activate the screen, simply press Enter once.
- When the message appears that Ubuntu was successfully installed, press Enter again to have the Wii reboot.
Start Ubuntu on the Wii
After the installation is complete, you can now start Ubuntu.
$config[ads_text5] not found- To do this, open the homebrew channel, click on "Ubuntu Wii" and on "Load". Then Ubuntu boots.
- With the A button on your Wiimote you make a left click and with the B button you right click.
- Tip: If you would also like to surf the Internet with Ubuntu, you must first start the WLAN configuration tool with the command "sudo ~ / whiite-ez-wifi-config" (without quotation marks).

In the video: Ubuntu for the smartphone.
The next practical tip will tell you how to install the Linux distribution "Fedora" in VirtualBox.