
Configure Ubuntu Firewall with UFW - Here's how
One of the firewall solutions for Ubuntu is the "Uncomplicated Firewall". You can read how easy it is to configure the UFW in this guide.
Installation of the Ubuntu firewall UFW
As with some Ubuntu programs, there are two versions of the UFW: the normal version can only be operated via the terminal, and there is also a version with a graphical user interface.
- Since the "Uncomplicated Firewall" is included in the standard installation of Ubuntu, you can easily install the package using the terminal command "sudo apt-get install ufw". This installs the normal command line based UFW version.
- If you want to operate the Ubuntu firewall via a graphical user interface (see below) and not with codes, use the "sudo apt-get install ufw gufw" command to also install the UFW GUI. This is particularly recommended for inexperienced users.
How to configure the UFW using the terminal command line
If you have decided against the graphical version of UFW, you can control and configure the Ubuntu firewall with the following terminal commands:
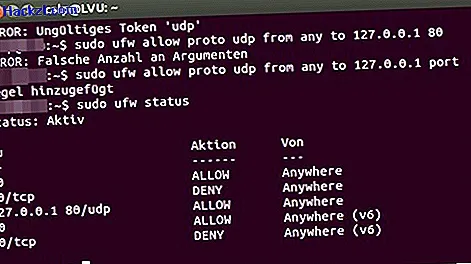
- "sudo ufw status" provides the current status of the Ubuntu firewall. If the response line is "Status: Inactive", you must first start the firewall.
- "sudo ufw enable" activates the UFW as a service on Ubuntu. This means that the firewall is also executed every time the program is started. If you want to deactivate the UFW again, use the command "sudo ufw disable".
- "sudo ufw allow | deny | reject SERVICE" is the simplest syntax with which new UFW rules can be configured. With "allow" you allow the respective service, with "deny" and "reject" you block the network traffic of the service. In the latter case, the sender of the package receives a notification that it has been blocked. All services are contained in the "Services" file under "etc /", for example ftp, http or pop3.
- "sudo ufw allow | deny [proto] [from [port]] [to [port]]" is the general syntax for configuring special firewall rules. The protocol is defined via "proto", ie UDP or TCP. The sender address and port are declared via "from". The destination address is set via "to".
- In principle, "any" can also be set as the value for the individual parameters in order to cover all possible values (IP addresses, ports, protocols). A possible rule would be "sudo ufw allow proto udp from 123.454.12.01 port 80 to any" - This allows UDP network traffic from the specified server address with port 80 to any destination address.
- "sudo ufw allow / deny [port] / [proto]" allows / disallows network traffic via a special protocol for a specific port. Example: "sudo ufw allow 21 / tcp" configures that all TCP packets coming through port 21 are accepted - regardless of the destination or sender address.
- "sudo ufw default allow / deny" controls all network traffic via the Ubuntu firewall. If you set the value "allow", basically all connections are accepted. In this case, the UFW would work like a blacklist, so that you only block what is to be blocked. However, it is advisable to ban all network traffic with "sudo ufw default deny" in order to release only the necessary services, ports and addresses.
- "sudo ufw logging on / off" (de-) activates the logging function of the Ubuntu firewall. If you set the value to "on", all actions of the UFW are recorded.
The easy configuration: Ubuntu firewall with GUFW
The Ubuntu firewall can be operated very intuitively with the graphical user interface (see picture gallery below).
This practical tip refers to a system with Ubuntu 12.04 "Precise Pangolin" and the UFW version 12.04.1. If you need further help with the Ubuntu firewall, you will find the manufacturer's instructions here and the ubuntuusers wiki entry here.