
Unity 5: Tutorial for beginners
With Unity 5, even laypeople can create games relatively easily. In this tutorial we will give you an overview of the program.
Unity 5 for beginners: the interface
Before you can really get started, you should familiarize yourself with the Unity interface. This consists of five essential blocks and other functions.
- Scene View: In the scene view you can work directly on the objects of your game.
- You can use the tools in the upper left corner to change objects in the scene directly, for example by moving or enlarging them.
- Game View: The game view is the opposite of the scene view and shows you a preview of how your scene will look in the game.
- Hierarchy: In the hierarchy you see a list of all objects that are in the scene. The sorting works alphabetically and hierarchically to group objects correctly.
- Project: In the project window you can see all the elements that are available to you and have quick access to them. This is not limited to objects such as 3D models, but also includes scripts and media data.
- Inspector: In the inspector you see a lot of information and setting options for the object that you have currently selected. You can select objects either via the scene view or the hierarchy.
- By default, the scene and game view are two tabs that you alternately show. You can also pull the individual fields apart and, for example, arrange them side by side.
- To do this, click on the tab and drag it to a new position while holding the mouse button down. This also works with all other work areas.
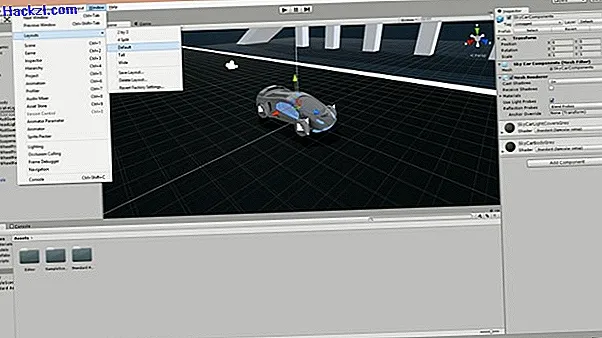
- In the "Window" menu, you can also activate numerous additional windows that provide you with additional functions and information.
- In the "Layouts" submenu you will also find some pre-arranged sorting. "Default" resets everything to the beginning. Alternatively, you can use the layout selection at the top right in the work area.
- At the top of the work area you can see the game controls. Start the demo with the play button, pause with the pause button and jump frame by frame with the frame button to search for errors and problems in detail.
- When you start the demo, Unity automatically jumps to Game View and lets you play your game.
- With the layer selection at the top right in the work area, you manage the layers of your project and can quickly switch between a selection of different objects.
Unity 5 for beginners: scene tools
- In the upper left corner of the work area you will see some icons with which you already have the most important tools for working in the scene view. You can also activate these with quick selection buttons, which we give you in square brackets.
- Use the hand tool [Q] to change the view. You do not edit the actual objects. If you hold down the left mouse button, you move the scene to the left, right, up or down. On the other hand, if you hold down the right mouse button, you turn around your own axis.
- If you hold down the [ALT] key at the same time, you will always keep the currently selected object in focus. Press [ALT] and the right mouse button, zoom.
- If you have lost sight of the currently selected object, you can refocus it by pressing [F] or double-clicking on the object in the scene view or hierarchy.
- The parallel shift [W], or simply the movement tool, is there to directly move objects in the scene. The recommended method is to click on the object and then move it individually using the three movement arrows. Alternatively, you can hold down the left mouse button and move the object directly.
- You can use the rotation tool [E] to change the orientation of the object by rotating it as required. It is also recommended to align each axis individually. If you use the possibility to rotate the object completely, the result is comparatively difficult to control.
- Use the scaling tool [R] to change the size and aspect ratios of the selected object. Here it is recommended not to edit each axis individually, but to click on the center of the object if you want to keep the aspect ratios.
- The rectangle tool [T] also allows you to change the shape of objects. With 3D objects, note that it is a 2D tool and you may have to rotate the view. This is the only way to edit the object from all sides.
- In the scene window itself, you can switch between different views that offer you different information and work options. Options include shading, wireframe and the alpha channel.
- You can also use a handful of switches to switch 2D mode, sound, light sources and other effects on and off.
- The "Gizmos" menu is there to change the individual display options of light sources, for example. For example, you can zoom in and out and switch between 2D and 3D.
- You can search for object names using the search function. All the wrong objects will then be hidden so that you can easily find the right ones in the scene. The hierarchy is also filtered according to the search results.
- At the top right of the scene view you will see a cross that is used to control the camera. With this you can easily switch between different views.
Unity 5 for beginners: the game mode
- You can switch to game mode at any time by pressing the play button at the top of the screen.
- Here you can set different screen resolutions and view statistics on the performance of the demo. You can also show the gizmos that you already know from the scene view here.
- You can pause the mode at any time or let it run frame by frame.
- You can also change objects during the demo to test different settings. Note that these changes will not be applied when you exit game mode.
- However, this only applies to object values that you have only set in your project. If you change prefabricated assets and their settings, they are saved permanently.
- To exit the game mode, press the play button again.

Unity 5 for beginners: hierarchies
- In the "Hierarchy" you will find all objects that you are using in the current scene. Not only can you sort them alphabetically, you can also break them down into other hierarchies.
- In this case, a hierarchy is nothing more than a group of objects as a group.
- The parent "parent" objects are comparable to folders.
- The objects in these folders are known as "children" objects.
- Note that hierarchies can have more than two levels. This means that a child object can itself be a folder with its own child objects as a parent object.
- Objects that are loose in the main hierarchy are processed relative to the world, for example when it comes to position. In contrast, children's objects are dependent on their parent objects.
- This means, for example, that you don't have to align all of the wheels of a car perfectly in the world, which would be relatively cumbersome. Instead, you have a parent element "Auto" in which you move all these elements together through the room.
- As with the "GameObject" menu item, you can use the Create button to add objects to the scene and thus to the hierarchies.
- The search function lets you filter and edit the objects more easily. If you start a search with "t:", look for object types instead of their names. For example, you can find light sources by searching for "t: light".
Unity 5 for beginners: project management and assets
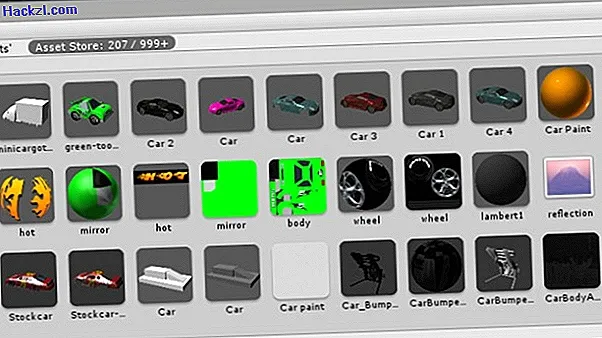
- You can see all the assets, i.e. different elements that are available in Unity, in the project window. You can then simply drag these to the other windows to activate them in the scene.
- Assets naturally include models such as game figures, but also snippets of code and scripts, textures, and audio and video sequences.
- With the "Create" button you can create new assets directly.
- You can also import existing assets after, for example, downloading them from another source.
- To import, use the menu item "Assets" and click here on "Import New Asset ..." or right-click in the "Project" window.
- An external option is the "Assets" folder. The structure of this folder and all its contents are also shown in the "Project" window. Accordingly, you can simply copy new assets into this folder to make them available in Unity.
- If you want to change the position of assets that have already been recognized by Unity, only use Unity. The program creates meta data that may otherwise no longer work.
- Here, too, there is a search function that basically works like everyone else. Sorting by type with "t:" is also possible.
- You can also search for pre-made labels that you can assign in the Inspector, for example.
- You can save particularly important search queries by clicking on the star to include them in the left column and make them easily accessible.
- Please also note that you can always switch between all your assets, the currently selected folder and the entire Unity Assets store for your search queries. So you can quickly find new elements that match your game.
Unity 5 for beginners: edit objects in the Inspector
- You can edit objects directly in a scene, but if you want to be very precise, use the Inspector. Here you work with hard numbers.
- The setting options depend on the type of asset you have currently selected.
- In general, however, you will always find a book icon with which you can learn more about the setting options.
- You can also reset the values with the gear wheel right next to the book.
- The lock icon above is useful if you want to keep an object in focus, even if you select other objects. Click again to let the Inspector change freely.
- You can also link objects in the Inspector, for example by simply dragging textures into a character's Inspector window.
- If you then want to understand the links, you can simply move the mouse pointer over the asset in the Inspector and the path will be displayed in the project window.
- You can also use these links to work directly on other assets and change them.
- Note, however, that the currently selected object may not be the only one that uses this asset. The changes then affect all objects that are linked to this asset.

Basically you can use Unity without any code experience, but knowledge is definitely helpful. Find out where you can learn how to program online for free in the next practical tip.