
Smartly edit vacation photos - the best tricks
Back from vacation, the editing of vacation photos begins. We will show you how to edit your holiday photos cleverly to do justice to the impressive moments.
1. Edit vacation photos: correct and refresh colors
Most of the time, the colors of the vacation photos, for example of the sky and the sea, are remembered more vividly and brilliantly.
- With a simple increase in saturation, you get impressive colors back.
- You can also increase the dynamics. In Photoshop you create a new setting level under Layer> New Setting Level> Dynamics. After confirming with OK, you can increase the dynamics as usual with the controller.
2. Remove sunburn on vacation photos
Once you get sunburn on vacation, it runs through the entire photo collection. You can use a simple trick to significantly reduce the sunburn, at least in the photos. In the following steps we use Photoshop to edit the photo, but of course you can also use other editing programs.
- Open your sunburn vacation photo in Photoshop.
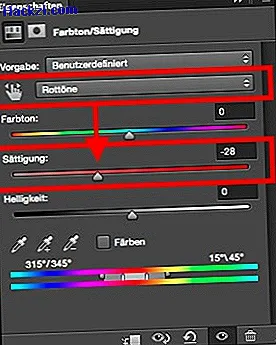
- You can change the saturation by creating a new setting level via Layer> New setting level> Hue / Saturation. If you may have other red areas in the photo, you must first create a mask.
- Now switch to "red tones" and reduce the saturation with the slider.
3. Vacation photos: straighten snapshots
If things have to go fast, it can happen that the picture has gone wrong. Then you can easily straighten your holiday photo with an editing program.
- Open your vacation photo in Photoshop.
- Select the crop tool (C key) from the toolbox.
- Then click the "Align straight" option. on.
- Now draw a line along the horizon to straighten the image accordingly. When you release the mouse, your vacation photo will be straightened automatically.

4. Sharpen vacation pictures
Last but not least, you should sharpen your vacation photos. It is important that you do this only at the end of the processing, since the sharpening is a local contrast increase and the image is otherwise over-sharpened.
- The easiest way to do this is with the Filter> Sharpening Filter> Unsharp Mask.
- Depending on the resolution, you should set different values. For photos that have an edge length of less than 2500 pixels, the threshold value 3 and a radius of 0.2 pixels are recommended. For larger photos you should select 0.3 pixel radius.
- Then use the Strength slider to control how strong the image should be.

More Photoshop tricks in the video
For your next summer vacation by the sea, we present a comparison of disposable underwater cameras.