
Format USB stick on Mac - Here's how
Related Videos: Create a Bootable USB Flash Drive for Windows 10 on MAC OS X (April 2024).
In this practical tip, we will show you how to format a USB stick on a Mac. This will delete all data on the storage device and set a new storage format. Make sure beforehand whether you still need the data.
Mac: Format USB stick
Latest videos
Open hard disk utility via Spotlight search: Here you format your USB stick on your Mac.

You will find the formatting settings in the "Delete" tab.

Choose between different formats.

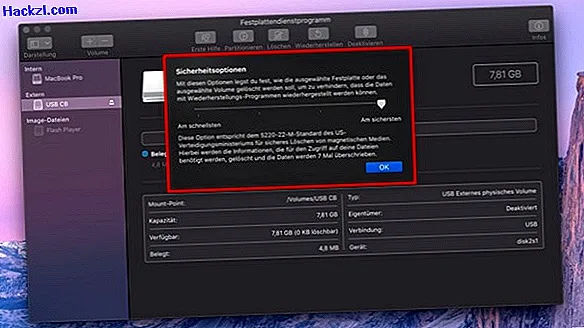
If necessary, delete sensitive data on the USB stick securely.
You can take a look at all of the following steps in the image gallery below. To format a USB stick on your Mac, first connect it to your computer via a USB port.
- Depending on the setting, a window appears showing how the medium should be handled. Close this pop-up.
- Enter "Disk Utility" in the Spotlight search. You can find the search in the top right corner of your menu bar by clicking on the small magnifying glass.
- Confirm with the [Enter] key.
- On the left in the hard disk utility menu you will see the name of your USB stick listed. Select it by tapping on the name.
- Switch to the "Delete" tab.
- With "Format" you can now choose between the predefined reformatting such as "FAT" or "Journaled".
- You can rename the stick under "Name".
- If you have sensitive data on the stick and want to make sure that it is completely deleted, you can use the "Security Options" button to overwrite your USB stick up to seven times.
- Click on "Delete" to finally format your USB stick.
Windows: Format USB stick
Latest videos
Select USB stick in Explorer
Start formatting for the USB stick
Format USB stick under Windows
You can also do what works on Mac OS on Windows:
- Press the [Windows] and [E] key at the same time so that the Explorer opens.
- Switch to "This PC" on the left, here you will find your USB stick.
- Right-click on the USB stick and select the "Format" option.
- Here you can choose between different settings. If you have no special requirements, click on the "Restore device standards" button.
- With "Volume name" you can give the USB stick a name if required.
- Activate the quick formatting to complete the process as quickly as possible. If you keep the USB stick and do not pass it on, the quick formatting is sufficient.
- Formatting starts with the "Start" button. Depending on the size of the USB stick, this process can now take a few seconds to minutes.
ISO To USB
The instructions refer to Mac OS Mojave and Windows 10. If you want to continue working with the stick, we will show you how to install several operating systems on the USB stick.