
Delete recovery partition in Windows - Here's how
Related Videos: Remove Or Delete EFi Or erase Problem System Partitions On USB PCIE SSD Or HDD (May 2024).
If there is a problem with the recovery partition under Windows, you can simply delete it with a few clicks. We'll show you how to do it step by step.
Windows 10: delete recovery partition
To delete the recovery partition, do the following:
- Press the [Windows] and [R] keys simultaneously so that the "Execute" command opens.
- Enter "diskmgmt.msc" here and confirm with "OK". Then the "Disk management" starts.
- Look for the recovery partition and see below what disk it is on. As a rule, it is "Disk 0".
- Press [Windows] and [R] again and enter the command "diskpart". Confirm again with "OK".
- Enter "select disk 0" if you are using disk 0.
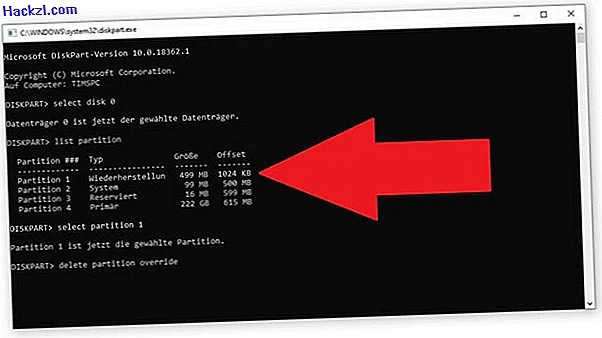
- Then enter "list partition" and choose the recovery partition. In our case it is partition 1.
- Now write the following command: "select partition 1". If the number deviates from you, adjust it in the command.
- Finally, type in the command: "delete partition override".
- Then the recovery partition is removed.
- In the disk management you can assign the new free space to another partition. Here we show you how to merge the partitions.
Does it make sense to remove the partition for recovery?
The recovery partition contains the most important files for the Windows system. If Windows can no longer start properly, it tries to repair itself using this partition.
- The recovery partition is between 450 and 499 MB, depending on the version of Windows. If you need more space on your hard drive or if the partition has problems managing the hard drive, you can safely remove the partition.
- However, in order to be prepared for the worst-case scenario, you should create a recovery CD.
