
Windows 10: disable automatic screen lock - how it works
Related Videos: Change Windows 10 Lock Screen Timeout Setting within Power Options (May 2024).
If you do not use your PC for a long time, Windows 10 automatically activates the screen lock. We show you how to deactivate this in this practical tip.
How to disable automatic screen lock on Windows 10
To disable automatic screen lock on Windows 10, you need to do the following steps.
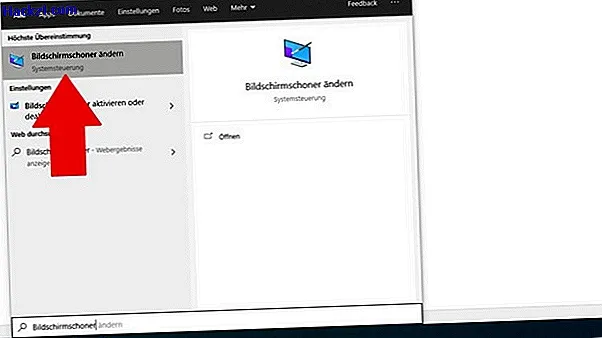
- Open the Windows search with the [Windows] + [S] keys and enter "Screen saver".
- In the search results, select the entry "Change screensaver".
- In the window that opens, remove the checkmark from "Login page when reactivating".
- With a click on "OK" you apply the setting and the automatic screen lock is deactivated.
Attached you will find screenshots of the individual steps.
Step 1:
Open the Start menu by clicking the Windows icon in the lower left.

Step 2:
If you enter the term "screen saver" on the keyboard, a search is started automatically. Select the "Change Screen Saver" result.
Step 3:
Deactivate the option "Login page on reactivation" and confirm with "OK". From now on, the screen lock will no longer be activated automatically.

In our next article, you will learn how to deactivate the lock screen in Windows 10 in order to go directly to the login window.