
Windows 10: Activate Hyper V - Here's how
Related Videos: Installing Hyper-V on Windows Server 2012 R2 (May 2024).
Activate Hyper V on Windows 10, you can create virtual machines and save yourself special software such as VirtualBox or VMware. The feature can be switched on in three different ways.
Activate Hyper V in Windows 10: The requirements
Not every computer with Windows 10 is suitable for virtualization. Hyper V, on the other hand, can only be activated on devices that meet the following requirements.
- Operating system: Windows 10 Pro, Enterprise or Education
- RAM: 4 GB RAM or more
- Processor: 64-bit CPU with second-level address translation (SLAT) and support for VM monitor mode extension ("VT-c" for Intel CPUs)
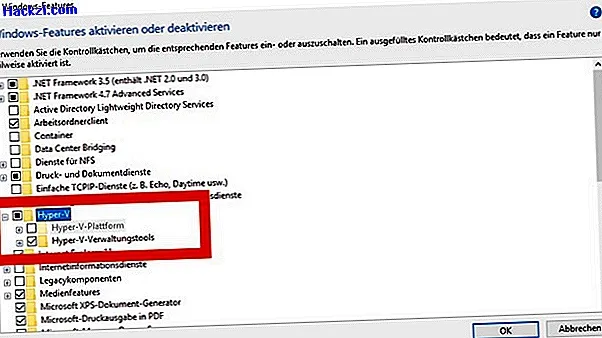
Windows 10: Activate Hyper V as a Windows feature
If your PC meets the above requirements, you can turn on Hyper V using the Windows features.
- Press the key combination [Windows] + [R] so that the Run dialog opens.
- In the new window, enter the "optional features" command and confirm with [Enter].
- Activate the "Hyper-V" entry in the new window and click "OK".
- You will then find the Hyper-V Manager in your programs. Start the tool and you can set up your first virtual machine.
Alternatively: Switch on Hyper V via the PowerShell
Instead of using the Run dialog, Hyper V can also be activated in Windows 10 using PowerShell.
- Press the key combination [Windows] + [X] and select the entry "Windows PowerShell (Administrator)" in the context menu.
- If a warning of the user account control appears, confirm this with "Yes" to start the PowerShell.
- In the new window, enter the command "Enable-WindowsOptionalFeature -Online -FeatureName Microsoft-Hyper-V -All" and confirm with [Enter].
- Hyper V is now activated on your computer.
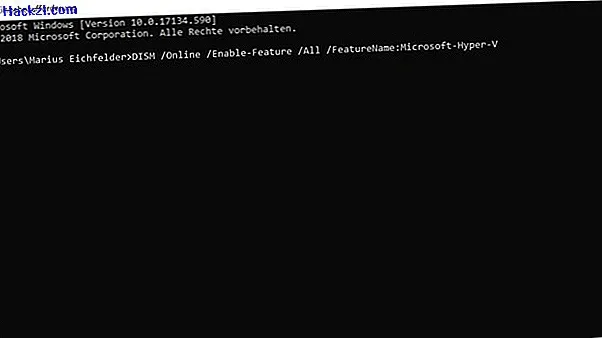
Another alternative: activate Hyper V via DISM
DISM (Deployment Image Servicing and Management) is an integrated Windows tool for image management. You can also use this to unlock Hyper V.
- Press the [Windows] and [R] keys simultaneously.
- Enter the "cmd" command in the Run dialog.
- Now hold down the [Ctrl] + [Shift] keys and confirm the entry with the Enter key.
- In the new window enter the command "DISM / Online / Enable-Feature / All / FeatureName: Microsoft-Hyper-V".
- As soon as the activation is completed, a corresponding message appears in the window. Finally press the "Y" key to restart the PC and complete the installation.
Although Hyper V offers numerous functions, special virtualization software is sometimes not available. We will show you exactly where the differences between Hyper V and VMware lie in another practical tip.