
Windows 10: Activate and deactivate Telnet Client
Related Videos: Configure Telnet in Windows 10 (May 2024).
Although the network protocol is no longer up-to-date, there is still a Telnet client under Windows 10. We'll tell you how to activate and deactivate it.
Activate Telnet Client in Windows 10
Before you activate the Telnet client under Windows 10, you should note that Telnet is a very outdated network protocol with only a few security mechanisms. For example, passwords are transmitted in plain text. Therefore, only use Telnet when you really need it.
- First, right-click on the Windows logo in the task bar and select "Programs and Features" from the list.
- In the new window, click on the "Activate or deactivate Windows features" entry on the left.
- The user account control may appear, which you must confirm with your Windows password.
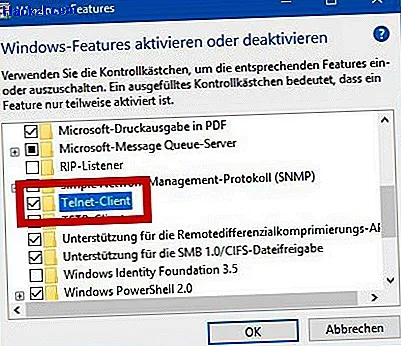
- Then look for "Telnet" in the list of programs and check the box (see photo).
- If you confirm your selection with "OK", the Telnet Client is activated. Repeat these steps and remove the tick from "Telnet", you can switch the tool off later.
Windows 10: Address with the Telnet Client Server
If you have activated the Telnet Client, you can test it directly.
- To do this, press the key combination [Windows] + [R] so that the Run dialog opens.
- Enter the command "cmd" there and confirm with [Enter].
- Enter the command "telnet" and the corresponding IP in the console (for example: "telnet 192.168.1.2"). Press [Enter] and your PC will establish a connection.
As already mentioned, Telnet is not really secure. If you want to send confidential data, you should therefore set up an SSH tunnel under Windows.