
Install Windows 7 on UEFI bios - how it works
If you have a PC with UEFI bios, you can install Windows 7 in two ways. If you want to take advantage of the UEFI bios, a simple installation is not enough. We'll show you how it's done.
Install Windows 7 on UEFI bios
- Most computers built in 2011 or later have the UEFI bios. The biggest advantage of UEFI is the quick start of the computer.
- If you install Windows in the usual way, the UEFI is ignored.
- You also need the 64-bit version of Windows 7. Only this contains the customized boot loader that is compatible with the UEFI. The 32-bit version of Windows 7 is unfortunately not suitable.

Step 1: burn Windows 7 to DVD
If you already have Windows 7 as a DVD, you can skip this step.
- With the Windows 7 USB / DVD Download Tool from Microsoft you can burn Windows 7 to a DVD.
- Install the tool and download the appropriate version of Windows. Windows 7 Home Premium (64-bit) and Windows 7 Professional (64-bit) are available in our CHIP download area.
- Start the "Windows 7 USB / DVD Download Tool" and click the "Browse" button. Select the location of the Windows version you just downloaded.
- Then click through the simple tool. Insert a DVD into your computer and select the installation from the DVD. When the tool has finished burning, continue with the next paragraph.
- In our practical tip video, we will once again show you in detail how to create a boot CD.
Step 2: install Windows 7 on UEFI bios
Instead of the normal installation of Windows 7, you now have to load the UEFI boot loader. Only he makes a UEFI-compatible installation possible.
- Insert the Windows 7 DVD into your computer and restart it.
- Instead of booting from the CD, you now have to open the UEFI. Simply press the "Esc", "F11" and "F12" keys several times during the start. "F1", "F2", "F8" and "Del" are also possible.
- If you do not get to the UEFI the first time and the installation of Windows 7 starts, switch off the PC and try again.
- If you made it to the UEFI, you will be asked directly from which data medium you would like to boot. If not, navigate to the "Boot order" category.
- You will now see your DVD drive twice in the display. Select the entry of the drive in front of "UEFI". You can do this easily with the "Enter" key.
- Then the installation of Windows 7 on the UEFI BIOS starts. Just follow the wizard until Windows is completely installed.
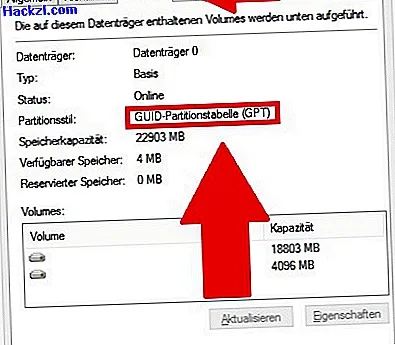
Step 3: check UEFI installation
- Press the "Windows" and "R" keys simultaneously so that the "Execute" command opens.
- Enter "diskmgmt.msc" here and confirm with "OK". Then the "Disk management" opens.
- Select the hard drive with the Windows installation. Right-click on the hard disk and then go to "Properties".
- Under the "Volumes" tab you will find the item "Partition style".
- If it says "GUID partition table (GPT)", the installation was successful.
In the next two practical tips, we will tell you what exactly is behind the terms UEFI and GPT.