
Windows 7: Remove entries in the context menu
After installing programs under Windows 7, many entries appear in the context menu. However, you can remove them again. We'll show you how.
Delete entries in the context menu under Windows Vista, 7 and 8
The context menu opens when you right-click anywhere in Windows. If you do this with one of your files, a long and cluttered context menu often appears. With the help of these instructions you can access the Windows registry. If the actions are incorrect, errors can occur in the system. Total beginners should therefore use the tool that is linked at the end of the practical tip.
- Simultaneously press the "Windows" and "R" keys and enter "regedit" so that the registry editor opens.
- First click on the "HKEY_CLASSES_ROOT" folder in the menu on the left.
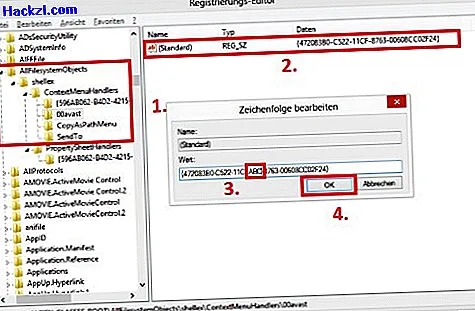
- Then scroll down until you reach the "AllFilesystemObjects" folder. Select the subfolders "shellex" and "ContextMenuHandlers" one after the other (see picture).
- In this folder you will now find a note for each entry in the context menu. This in turn contains a file. Select this with a double click (2.).
- You will now see a value consisting of a long string. Change this, for example by writing "ABC" in the middle of the chain so that the value becomes invalid (3.).
- Then click on the "OK" button (4.). Now check whether the entry in the context menu has disappeared. If this is not the case, undo the change in the value. If it has disappeared, you can delete it.
- To do this, right-click on the file in the registry editor and select the delete option. Confirm the subsequent query with "Yes".
- If you do not find all entries in this folder, look in the following path in the registry editor: "Folder", "shellex", "ContextMenuHandlers".
Alternatively, you can also remove the entries using the CCleaner program. This is a simple alternative, especially for beginners. You can read how this works in this practical tip.