
Windows 7 save space - the best tips
Over time, Windows 7 accumulates some unnecessary data. You can delete them to save space. We explain how this works here.
Save space by deleting the hibernation file
When your computer hibernates, the "hiberfil.sys" file on the Windows 7 system drive stores all of the main memory. By deactivating it you gain a lot of storage space, because this file is always as big as your working memory. Depending on the computer, it can be a few gigabytes. Since Windows Vista it is unfortunately no longer possible to deactivate the file via the control panel. That is why you have to make the entry via the command line.
- Enter "cmd" in the entry field of the start menu.
- Right-click on the search result that follows and select the "Run as administrator" option.
- Confirm the security question of the system with Yes.
- In the command line window that appears, enter: "powercfg -H off"
- There is no confirmation of the change. So check to see if the system hard drive space has increased.
- If you want to reactivate hibernation later, repeat the above procedure, but enter at the end: "powercfg -H on"
Disable System Restore to save space
System restore can also take up a lot of space. Follow these steps to disable system restore:
- Click "Start, " then right-click "Computer, " and click "Properties."
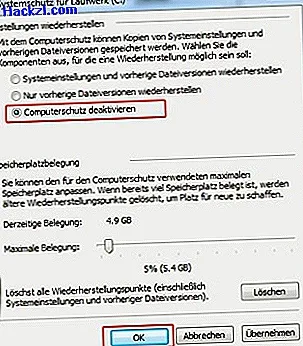
- In the dialog box that follows, select "Computer Protection".
- Select a drive and then click on "Configure ..."
- In the following dialog box, activate the "Deactivate computer protection" check box and confirm with OK.
- You will be asked if you really want to disable computer protection. Click on "Yes".
However, please note: In the event of a possible PC crash with data loss, you no longer have a restore point with which you can bring your system back to the old state. This procedure is therefore only recommended if you urgently need the storage space.
Save storage space by deactivating the swap file (virtual memory)
Under older versions of Windows, it was still necessary to optimally configure the swap file, because at that time the working memory was mostly limited and Windows used the swap file intensively. If you have more than 2 GB of RAM, which should be the case in all modern PCs, you can try out the swap file.
- To do this, click on "Start" and then on "Control Panel".
- In the "System and Security" menu item you will find the "System" grid.
- In the left pane, select the "Advanced system settings" option.
- Another window opens. Under the "Advanced" tab in the "Performance" area, click the "Settings" button.
- Under "Advanced" you will find "Virtual RAM". Click on "Change".
- Uncheck the box "Size is managed by the system" and activate the option "No swap file".
- Confirm the information by clicking "Set" and "OK".
- NOTE: You may receive an error message or the application may crash at worst if your system cannot manage without virtual memory. Then start Windows in Safe Mode. To do this, press the key at system start and select the "Secure" option in the boot menu. Then activate the "Size is managed by the system" check box as described above.

You can find more Windows practical tips here.