
Windows 7 system partition increase - how it works
Related Videos: Fix We Couldn't Update System Reserved Partition on Windows 10 (May 2024).
If you run out of space on your hard drive under Windows 7, you should enlarge your system partition. These instructions also work under Windows Vista and Windows 8.
Step 1: Windows 7 - Open Disk Management
In the following we refer to the primary partition as the one on which Windows is located. This is the system partition, usually titled "C:". The secondary partition usually contains only a little data to restore the computer, usually titled "D:".
- Press the "Windows" and "R" keys simultaneously so that the "Execute" command opens.
- Enter "CompMgmtLauncher" here and confirm with "OK". Then the "Computer Management" opens.
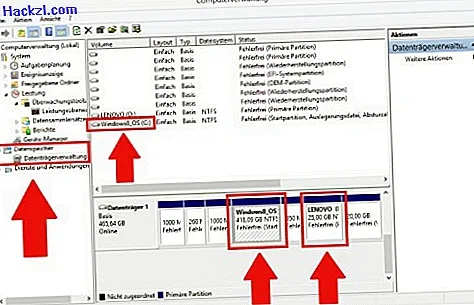
- Click on "Disk Management" under the "Data Storage" category on the left.
- Select your hard drive on which the system partition is located.
Step 2: shrink secondary partition
To enlarge the primary partition, you must first shrink the secondary partition and delete part of it.
- Right click on the secondary partition and select the "Shrink Volume" option.
- The partition should be reduced in such a way that the unallocated memory then holds all data of the current secondary partition. For example, if there are 3 GB on the secondary partition, you should only shrink the partition by 3 GB.
- If you click the "Shrink" button, the secondary partition is shrunk and a storage space is created that is "not assigned".
- Right click on the "unallocated" storage and select the option "New Simple Volume". Then the tertiary partition is created.
- Note: If the secondary partition is not shown as "not assigned", right-click on it and select the "Format" option.

Step 3: delete secondary partition
- Before we delete the secondary partition, you should transfer all data to the tertiary partition. Simply copy the folders one by one from the secondary to the tertiary partition.
- Once this has been done, right-click on the secondary partition in Computer Management. Select the "Delete volume" option here.
- The storage space of the secondary partition is now shown as "not allocated".

Step 4: enlarge Windows 7 system partition
- Right click on the primary partition and select the "Extend Volume" option.
- You can now add "unallocated" storage to the primary system partition.
- Note: To avoid problems with the tertiary partition, you should change the drive letter again. With a right click on the tertiary partition you can "change drive letters and paths".

We'll show you how to encrypt your system partition with TrueCrypt in the next practical tip. If you need individual help with the enlargement of a system partition, then contact the experts in the CHIP forum.