
Windows 8.1: Reset BIOS to factory settings
If you have to reset the BIOS or UEFI of Windows 8 or Windows 8.1 to the factory settings, there is usually an error in the system.
Step 1: Start BIOS / UEFI under Windows 8 or 8.1
Since Windows 8, the BIOS on most computers has been replaced by the UEFI. In principle, not much has changed, but the BIOS or UEFI is now somewhat more user-friendly. To call it up, you can press the "Shift" and "F8" keys at the same time when starting, but since the time window when booting is very short on new PCs, it is better to proceed as follows:
- Restart the computer or lock the computer with the key combination "Windows" and "L". You are now on the login screen.
- At the bottom right you will find the power button. If you click on the button, the option "Restart" opens up. Select the option with the mouse and simultaneously press the "Shift" key above the "Ctrl" key.
- After a short wait you will see a blue screen. Select the "Troubleshooting" item there.
- Then click on the "Advanced Options" and open the "UEFI Firmware Settings". To do this, click on the "Restart" button.
Step 2: Reset Windows 8.1 BIOS / UEFI to factory settings
If your computer does not have the UEFI, for example because you bought Windows 8 yourself and installed it on an older computer, you will find further instructions for calling up the BIOS in this practical tip.
- If you are now in the BIOS / UEFI, you have to search for the function to reset the settings. Depending on the manufacturer, this is hidden in a different place.
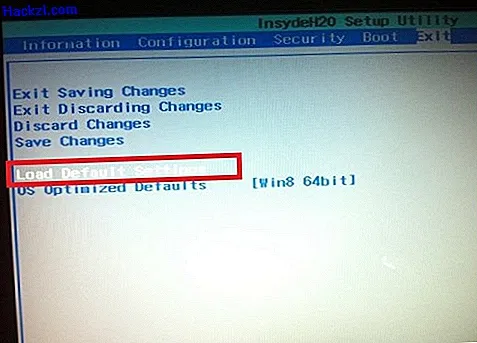
- The option was found on the test device under the "Exit" tab. Navigate to "Load Default Settings", press "Enter" on your keyboard and then confirm.
- The computer is restarted, the BIOS has been reset to the factory settings.
If this still does not solve your problem, you can also perform a BIOS reset on desktop computers.