
Windows Installer not working - what to do?
The Windows Installer is required to install many programs. In this practical tip, we will tell you what you can do when it stops working.
This is how your Windows Installer works again
If your Windows installer is not working, it is very likely that it was accidentally disabled. However, you can reactivate it in just a few steps. The picture gallery shows you the necessary navigation through the control panel.
- For example, open the Control Panel by typing "Control Panel" in an Explorer window.
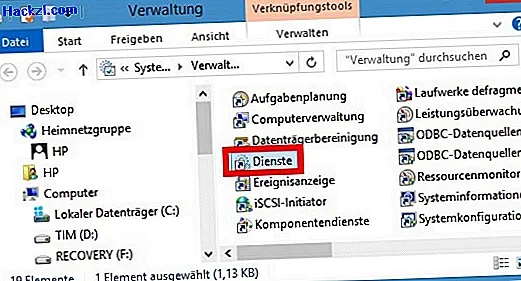
- Select the "Administration" icon and double-click the "Services" here.
- Find the "Windows Installer" service, right-click on it and select "Properties".
- A new window appears. In the "General" area, set the start type to "Automatic".
- Restart your computer.
Further solutions for a defective Windows Installer
Problems with the Windows Installer can arise from viruses or incorrect registry entries. You can correct these errors with the following steps:
- The Windows Installer can be deactivated or corrupted by a virus. Perform a virus scan with at least one current anti-virus program.
- The Windows installer file in particular is at risk. Here you can have the file checked by the Kaspersky virus scanner.
- Also perform an online virus scan with Bitdefender or ESET.
- If a virus scanner is found, remove the virus and infected files.
- Navigate to "C: \ WINDOWS \ system32 \" and locate the "msiexec.exe" file. If this file is 0 bytes in size, delete it.
- Reinstall the Windows Installer.
These instructions refer to Windows 7. In other versions of Windows, the names and elements of the control panel differ slightly. If you need them regularly, you can create the Control Panel as a desktop shortcut.
Latest videos
Type "Control Panel" in an Explorer window to navigate to the Control Panel. Select "Administration" here.

In the administration there is a link to the Windows services.
Look for the "Windows Installer". Right click on it and select "Properties".

Here you can set the start type of the Windows Installer to "automatic" in the "General" area. After a restart your Windows installer should work again.

If this is not the case, first make sure that it is not a virus. Then check whether the file "msiexec.exe" exists in the folder "C: \ WINDOWS \ system32 \" and is a few KByte in size.

If this file is missing or it is clearly too small, it is best to reinstall the [[//www.chip.de/downloads/Windows-Installer-MSI_13000405.html|Windows Installer]].
