
Word: Insert automatic table of contents - how it works
To save time with homework and long documents, you can insert an automatic table of contents in Word. We'll show you how this works fastest and easiest.
Insert automatic table of contents in Word
- Open Word and navigate to the "References" tab.
- In the upper left corner you will find the "Table of Contents" button.
- Click with the mouse where you want to insert the directory and select an "Automatic directory".
- You will now only see the "Content" heading. We will show you how to fill the directory in the next step.

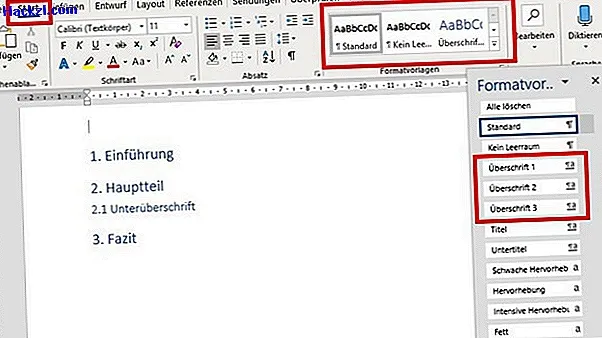
Word: Automatic table of contents - use headings
- After you have inserted the table of contents, click on the "Start" tab.
- In the format templates you will already find two preset templates with the names "Heading 1 & 2"
- To transfer your existing headings to the table of contents, select the heading and click on the "Heading 1" style.
- To add a subordinate bullet point to the heading, choose Heading 2.
- Finally, navigate to your table of contents and click on "Update table of contents".
- Tip: We will show you in the next practical tip how you can adapt the styles of the headings.
So that your table of contents adopts the correct page numbers, we will show you in the next practical tip how you can only start the page numbers from page 3.