
Word: Format headings and create a style
With the existing styles, you can format headings uniformly in MS Office Word. If you don't like the existing templates, you can adapt them or create new styles.
Format headings in Word
When you insert a table of contents into your Word document, Word automatically enters all headings that you have formatted using a style. This is useful, for example, when you format a homework in Word. Use the following steps to format headings in Word accordingly.
- Mark a heading in your Word document and switch to the "Start" tab.
- In the middle of the menu bar you will find the styles. Select "Heading 1" from this (see screenshot).
- Use this method to format any additional headings that should appear in the same typeface. If you don't like the font, color or size, you can adjust it later in just a few steps. You can read more about this in the next paragraph.
- If your document contains other headings that should appear in a different format, you must select the "Heading 2" style for these.

Word: Create and edit styles
If you need additional styles or if you don't like the existing ones, you can edit them or add new ones. If you change a style, you can automatically adapt all text passages that you have formatted with it to the new format.
- For example, to edit the "Heading 1" template, right-click on the template and select "Modify". Here you can edit the font, size and color and determine the paragraph or line spacing. If you want to adapt all headings to the new format, check the box next to "Update automatically" and then click "OK".
- To create a new style, click on the "More" icon (see screenshot) next to the templates and select "Create style". You can then name the style and find it in the top bar next to the existing templates.

Tips for creating styles and headings in MS Office Word
If you edit the template of a heading, you will immediately find the fields for font, size and color. With the following tips, you can design your style even further.
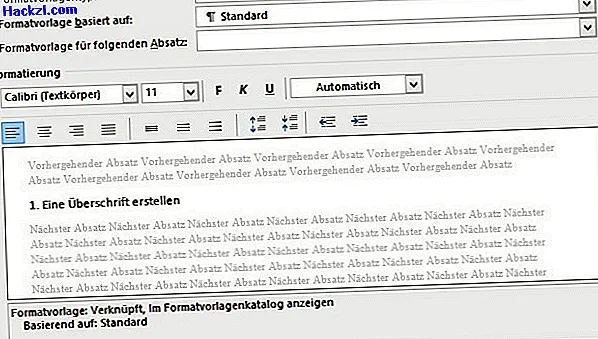
- Behind the "Style based on" field you can choose between standard Word formats. If you need different headings - for example to differentiate between "1.", "1.1", 1.1.1 "- you should create a correspondingly large number of different styles and these in turn on" Heading 1 ", " Heading 2 "and Co. Only then can Word automatically structure the headings correctly in the table of contents.
- In the "Style for next paragraph" field, you specify the formatting in which your text will continue after you insert a line break after a heading. This saves you from having to adapt the format of the following paragraph after each heading.
- At the bottom of the window you will find the "Format" selection list. Click on it to carry out advanced formatting - for example for frames, text effects or the language.
- If you have created a table of contents in Word, but the headings do not yet appear in it, you must first update the table of contents.
Note: These instructions were created with Word on Windows 8.1. In the next practical tip we will explain how you can number headings automatically in Word.