Word: Activate and use correction mode
Word's correction mode helps a lot when you are working on a document with several people. This means that the changes and comments made by fellow campaigners are clearly visible to everyone. In this guide, we show you how to activate and use correction mode.
Activate and use correction mode in Word
If you have finished writing a text and want to have it corrected by experts or have it critically reviewed, save it in the activated correction mode. To do this, proceed as follows.
- In the Word menu, open the "Review" tab and activate the "Track changes" command in the "Track" button. The symbol and command are now highlighted in blue. Everything that is now deleted or added now appears in the default setting in red or with a red line through it in your document.
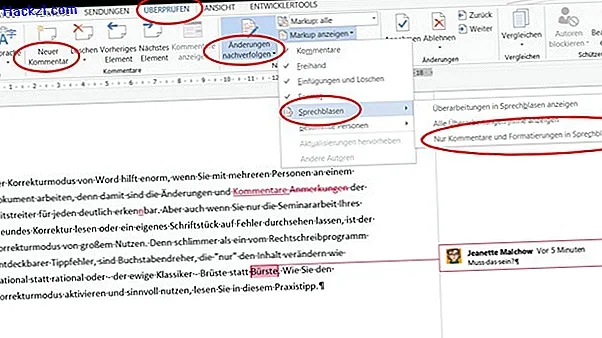
- You can select which changes should be shown in your text in the "Show markup" submenu. This becomes visible when you click on the small triangle next to "Show markup". Check the entries whose corrections you want to see in the document.
- You can also change the formatting of the corrections. To do this, go to the entry "Speech Bubbles" in the submenu "Show Markup". The default is "Show only formatting and comments in speech bubbles". For example, if you want to see all changes outside the text, check "Show revisions in balloons".
- If you now receive a corrected and commented text, you can decide whether you want to apply all changes directly or whether you want to check them step by step. Open the submenu for the "Accept" command on the "Review" tab and specify how you want to proceed.
- Perhaps your proofreaders also had comments on the content of the text. These can be inserted by clicking on the "New Comment" command in the menu of the "Review" tab. A comment is now inserted at the point where the mouse is in the text.
- If you get a commented document back, you can jump from comment to comment using the "Previous element" and "Next element" commands in the "Comments" button.