
Flashing XBOX 360 - a guide
If you want to play burned games on your XBOX 360, you have to flash them first. This practical tip shows you step-by-step instructions on how to proceed with flashing.
Step 1: prepare to flash the XBOX 360
Before you can start with the actual process, you must first prepare the console:
- Therefore, look for updates for the XBOX 360 and install them.
- You must then carefully remove the console drive.
- If you have done this successfully, disconnect the drive from the console and search for the manufacturer name.
- There are four different manufacturers of the drive: Lite-On, Samsung, BenQ and Hitachi.

Step 2: Download the tools you need
Now download the software required to flash the drive:
- For this you need the Jungle Flasher and the appropriate firmware for the drive.
- Note: If you have a Hitachi drive, you need this firmware to flash.
- After downloading, unzip the JungleFlasher archive. You do not have to install this, just unzip it to the desktop or anywhere.
- Then you have to extract the firmware files into the JungleFlasher directory.
- Then change to the "libsub" subfolder in the JungleFlash folder and copy the "libsub0.dll" file into the root directory of JungleFlash (where the JungleFlash.exe file is also located).
- You must then copy both files from the "PortIO" folder into the same directory.
Step 3: Connect the XBOX 360 drive to the PC
- So that you can connect the drive to your PC, you first need the "USB Connector Tool" and the appropriate power adapter.
- You also need a PCI-E power adapter.
- If you have a Lite-On drive, you must now carefully disassemble it. To do this, you need to flip the drive and remove four screws so that you can remove the bezel.
- Now connect the XBOX360USBPro tool to the CK3 Lite module and connect the drive to the module. Then you have to connect the PCI-E power adapter to the module and to a socket so that you have power.
- You now need a so-called button for the Lite-ON drive. You must connect this to the USB port on the drive and connect the end of the cable with the push button to the power connector of the drive so that the button lights up.
- Now connect the SATA cable to the USB port of the DVD drive so that data can be transferred.
- Now you can connect the USB connector to the PC. Plug it directly into a free USB slot, otherwise not enough power will be transferred.
Step 4.1: Flash the Samsung and BenQ drive of the XBOX 360
Now you can start flashing the drive. Since there are different drives, we present the different procedures here. First, let's start flashing the Samsung drive. Note: These instructions also work with BenQ drives.
- Start the "JungleFlasher" tool, provided you have connected the drive to the PC as described above.
- Then click on the "DVDKey 32" tab in the program. The key "Not verified" should appear under "Drive properties".
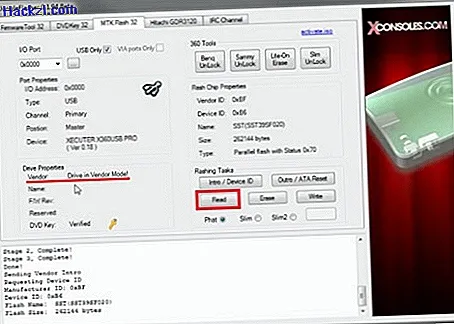
- Then switch to the "MTK Flash 32" tab and click the "Sammy UnLock" button. Confirm this with "Yes" (see gallery).
- Wait for the process to finish. After that, the value "MTK Flash 32" should appear under "Drive properties". In addition, the "Drive in vendor mode" property should be displayed under "Vendor" s. Gallery).
- Now you have to copy the old firmware with a click on "Read". Then select a location where you can find these files quickly (see gallery).
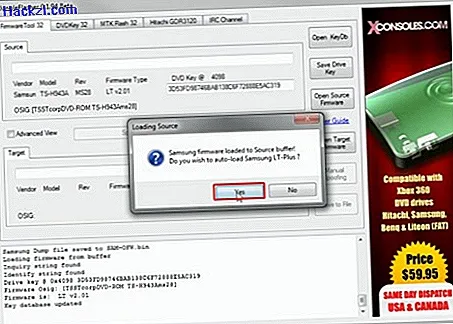
- When this is complete, you will be asked to load the Samsung LT + or BenQ firmware. Confirm with "Yes" (see gallery).
- So that you can restore the drive later, click on "Save drive key" and select a safe place (see gallery).
- You should also save the firmware by clicking on "Save as file" (see gallery).
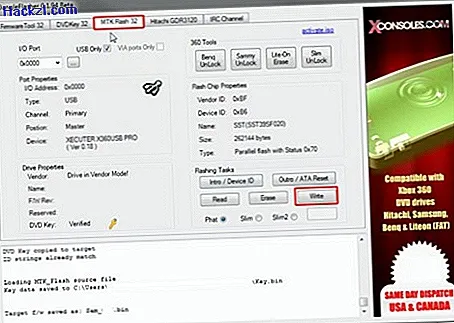
- Then switch to "MTK Flash 32" and click on "Write". Wait until this process has been successfully completed (see gallery).
- You can then exit the mode by clicking on "Outro / ATA Reset". The entry "DVD key" under "Drive properties" should now have the value "Verified" (see gallery).
Step 4.2: Flash the Hitachi drive of the XBOX 360
- Start the "JungleFlasher" tool here too.
- Now you need to check which Hitachi drive you have. To do this, click on "Hitachi GDR3120". If the option "78/79" appears under "Drive revision", you must burn an additional CD to unlock the drive. If not, you can go to step 6.
- To do this, click on "79 Insert audio CD to unlock" so that the browser opens and you can download the required file and burn it to a blank CD-R. In the next step you have to switch on the "Mode-B" by clicking on the "Send Mode-B" button. A new window appears, but you can close it with "OK".
- Now insert the CD to unlock it. To do this, click "Open" to open the drive bay. Insert the CD there and click on "Close". To start the process, select "79 Unlock". Wait for this process to finish. Note: This procedure is only necessary if you have drive version 79.
- For security reasons, you should back up the drive data. To do this, switch to the "Flash Options" area and make sure that the "Dump Drive" option is activated here. Then click on the "Read source" button and save this file in a safe place.
- Now you have to save the drive key in a safe place by clicking on "Save drive key".
- Then start flashing. To do this, click on the "Hitachi GDR3120" tab and select the "Flash LT-Plus" option. Confirm this by clicking "Flash LT-Plus" and "Yes" as soon as the program says that the Flash report is stable.
- Wait for the process to finish. This is shown in the text box below.
Step 4.3: Flash the XBOX 360 Lite-On drive
- Here, too, you have to start the "Jungle Flasher" tool first.
- Turn the drive over and look for the item "MPX01" on the board of the drive.
- In JungleFlasher you now have to open the "DVDKey 32" tab. Click on "PhatKey" there and wait for the program to load completely. As soon as the message "MTK Vendor Intro failed" appears, you can get started. Make sure that the light of the push button lights up so that the power supply is available.
- To check the drive, press and hold the button on the cable of the button. Then touch the "MPX01" point while pressing the button. Keep it pressed, you can now release the button on the cable. A dialog box is now displayed in JungleFlasher, which you can confirm with "Yes".
- In the next window you have to remove the button and reset the drive. To do this, pull the button away and switch off the power at the USB connector. Wait five seconds and turn the power back on. Then you have to click on "Ok" in JungleFlasher.
- You will then be asked to save the key. Look for a safe place for it.
- If you have successfully saved the key, you will be asked to load the "Lite-On LT +" firmware. Confirm this with "Yes".
- In the "FirmenwareTool 32" tab, you must now click on "Manual Spoofing" in order to then load the key just saved via "Load key bin".
- Click on "Save as file" to save the firmware files. This is useful for a later procedure.
- Now you have to delete the drive. To do this, switch to the "MTK Flash 32" tab and click on "Delete Lite-On". Confirm the process with "Yes". If the "..." symbol appears below, you must briefly disconnect the drive from the power supply. To do this, either press the off switch or disconnect the power cable from the drive.
- With a click on "Write" the new firmware is now written. Wait for this process to finish.
- If this is the case, you can exit the mode by clicking on "Outro / ATA Reset". You can then close the program and install the drive back into the console. To do this, reverse the procedure as described in step 3.
Latest videos
To be able to flash the drive, you must now release it. To do this, click on "Sammy UnLock" under "MTK Flash 32".
You must confirm this process.

As soon as the drive is in vendor mode, you can save the company goods by clicking on "Read". To do this, look for a safe place on the PC.
Now you are asked to load the Samsung or BenQ firmware. Confirm with "Yes".
For security, you should now save the drive letter in a safe place by clicking on "Save drive letter".
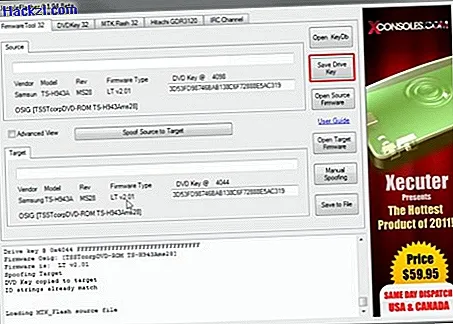
This also applies to the firmware. You save this by clicking on "Save as file".

Now you can start the actual flash process under "MTK Flash 32" by clicking on "Write". This may take a while.
The process is complete as soon as the key is marked with "Verified". Then you can exit the mode by clicking on "Outro / ATA Reset".
