
Open Xbox One NAT - Here's how
Related Videos: FIX Party Chat / Get Open NAT for Multiple Consoles on Netgear 2019 (May 2024).
To be able to play online with your Xbox One without any problems, you need the NAT type "Open". We'll show you how to open NAT.
Open Xbox One NAT with a static IP address
To switch to the Open NAT type, you need to assign a static IP address to your Xbox One. You do this either in your router or directly via the Xbox One settings.
- First you need to find out the current network settings of your Xbox One.
- To do this, go to the Xbox One start menu by pressing the Xbox button on the controller.
- Open the "Settings".
- Select "Network" here.
- If you now open the "Advanced Settings", you will see the information you are looking for on the right-hand side.
- Make a note of both the IP address and one of the MACs.
- If you connect your Xbox to the Internet via cable, take the Wired MAC. If you use WLAN, write down the wireless MAC.
Create a static Xbox One IP address in the router
- Open the router settings on your PC. These vary depending on the model. This practical tip explains how to get into the router menu.
- If deactivated, allow manual IP address assignment.
- Now set a new static IP address for Xbox One. To do this, enter the MAC address and the IP address you wrote down in the appropriate fields. The router now tries to always assign the device the same IP address with this MAC address.
- Check whether the IP address you want to assign is already reserved for DHCP assignment. Some routers block reserved IPs for manual assignment.
- Which IPs are reserved differs from router to router. Please read the instructions for your router.
- Now test the connection in the "Network Settings" of Xbox One.
- If the connection works, you now have to make sure that some ports are open so that the NAT type changes to "Open".
- Every router offers the option to open ports. The exact procedure differs from model to model.
- Open the following ports so your Xbox One receives all the information it needs:
- TCP: 53, 80, 3074 UDP: 53, 88, 500, 3074, 3544, 4500
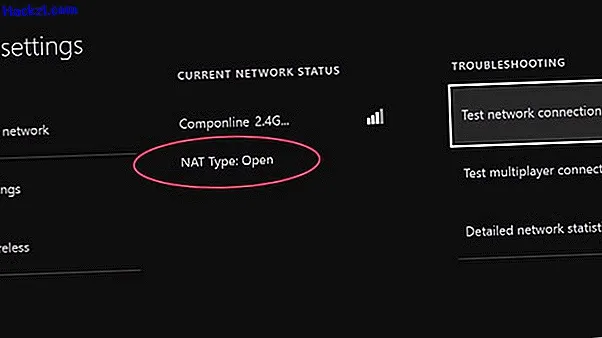
- Once everything is set and saved, open the "Network" menu again in the Xbox One settings.
- Click on "Test network connection" on the far right.
- If the system was able to connect, go back to the network settings.
- Now test the connection again. The settings screen should then show that the NAT type is now open.
- If a connection is no longer possible or the NAT type is still moderate or strict, check whether the settings in the router are correct.
- If that doesn't help, reset the settings and contact Xbox support.
Static Xbox One IP address
- To statically set the IP address directly in your Xbox One, open the "Network Settings" again and here the "Advanced Settings".
- On the right side you can see your connection information, such as IP address and subnet mask. Write down all the information.
- Now you have to log in to your router management with your computer. This practical tip explains how to get into the router menu.
- Here you can check which IP addresses are reserved by the router.
- Choose a number between 2 and 254 for your Xbox One that is out of DHCP range. For example, if the numbers 100-254 are reserved, you can choose a number between 2 and 99 for the Xbox One.
- For example, if you choose 99, the IP address might look like this: 192.168.0.99. The first three blocks of the IP address can also be different depending on the router settings. This practical tip explains more about the topic.
- To make sure that this number is not already occupied by another device, you should ping it.
- To do this, open the Windows Start menu and enter "cmd" in the search window. Confirm by pressing [Enter] to start cmd.exe.
- Now enter "ping 192.168.0.99" in the command prompt. Again, the number blocks are only an example and can look very different. Confirm with [Enter].
- After a short delay, the window should display four lines with either "Destination host unreachable" or a time like "bytes = 32 time <1ms TTL = 80".
- If you receive a time, it means that the IP address has already been assigned and you have to test another one. In the case of "Destination host unreachable" you can use this address for your Xbox One.
- After you have found a suitable IP address, switch back to Xbox One and open the "Advanced Settings" of the "Network Settings" again.
- Open the "IP settings".
- Switch from automatic to manual in the DHCP settings.
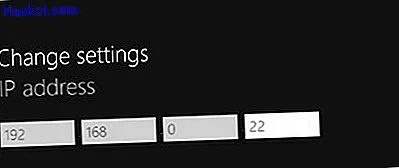
- Now you can type in the IP address that you have just tested.
- Then enter the other data, including the subnet mask. To do this, use the information you wrote down in point 2.
- Save the changes, then test the connection.
- If everything is OK and the connection works, share some ports in your router:
- TCP: 53, 80, 3074 UDP: 53, 88, 500, 3074, 3544, 4500
- Save these changes and test the connection again. The NAT type should now be open.
- If you have connection problems, you can set the manual IP assignment in your Xbox One to automatic at any time. That should undo all changes in the console.
- If the NAT type is still not open despite the correct settings, contact Xbox support.
If you also have connection problems with your Speedport router, this tip will help you.