
Gimp: Convert photos to CMYK mode
For some printers, it is necessary to convert your photos into CMYK color mode using the "Gimp" image editing program. By default, Gimp does not have this function, which is why you need to retrofit it with a plugin. We explain how this works in this practical tip.
Convert graphics to CMYK mode with Gimp
- Download the "Separate +" plugin. You can find the download at the end of the website. To open the ZIP file you need an extractor like the program 7-Zip.
- In the extracted folder you will find the files "icc_colorspace.exe", "separate.exe" and "separate_import.exe". Paste this into the path "C: /Users/YOURUSER/.gimp-2.8/plug-ins".
- Download the "Adobe ICC Profiles".
- Unzip the ZIP file and move it to the path "C: / Windows / System32 / spool / drivers / color".
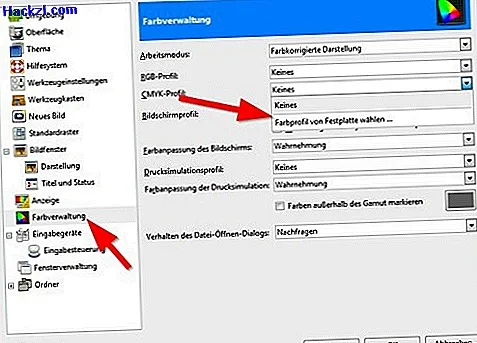
- Now open GIMP. Under "Edit" and "Settings" select the option "Color management". Here you can now select a color profile from the hard disk under "CMYK profile". You have to select the "CoatedFOGRA27" file from the path under which you previously inserted the Adobe color profiles.
- Click on the "Edit" tab and then on "Settings".
- Select "Color management" on the left side.
- Click the drop-down menu next to "CMYK profile" and select the "Choose color profile from hard drive ..." option.
- Navigate to the path "C: / Windows / System32 / spool / drivers / color" and select the file "CoatedFOGRA27".
- Now open your photo and click on "Image"> "Separate"> "Separate".
- Select the "Coated FOGRA27" option under "Destination Color Space" and check "Make CMYK pseudo-composite".
- Now you get your graphic in CMYK color mode. All you have to do now is save your photo.
In the next article we will show you how you can create photo montages with Gimp. These instructions refer to Gimp 2.8.10.