
Meeting with Teamviewer: Instructions
With TeamViewer you can not only maintain your PC remotely, but also start meetings. This guide tells you how to start, join, and what features are available to you.
Step 1: Install or start TeamViewer
- Download the free TeamViewer and start the installation file.
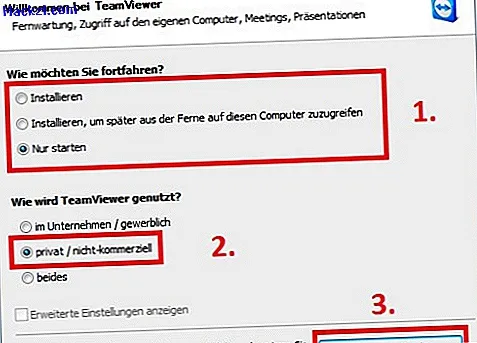
- You do not have to install TeamViewer. The "Start only" option is sufficient if you use the program only rarely or once. This way, no program data is stored on your computer. However, if you would like to use TeamViewer more often, we recommend the "Install" option.
- Select "private / non-commercial" as the type of use below, provided you are not using the meeting for business purposes or are not earning any money with it.
- Then click on the "Agree" button at the bottom right and the program will start after a few seconds.
Step 2: start the meeting
- When TeamViewer is started, you will see the two tabs "Remote maintenance" and "Meeting" at the top. Switch to the meeting there.
- The easiest and fastest way is a spontaneous meeting. With the button "Start spontaneous meeting", you can start.
- If you would like to plan meetings in advance and schedule the time and participants, click on the "Schedule meeting" link below. However, you need a free TeamViewer account for this. However, this is actually only worthwhile for business use.
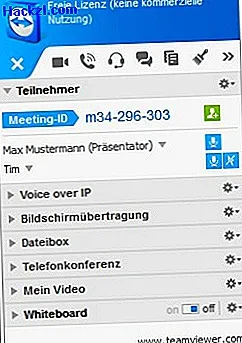
- When the meeting has started, a window opens on the right. In this you have control over all functions of the meeting. First of all you have to invite the participants of the meeting. To do this, pass on the "Meeting ID" to your contacts.
- They also have to open TeamViewer, click on the "Meeting" tab and enter the "Meeting ID" on the right. With the button "Attend the meeting" a window opens in which your contact now sees your desktop. However, he can only look at it.

Step 3: Use communication in the meeting
There are numerous ways in which you can contact and interact with your meeting partners. All this is done via the TeamViewer window (see picture).
- Desktop sharing: The audience of the meeting can only watch at the very beginning. If the participants click on their screen with the mouse, a large blue mouse arrow with the name of the user is briefly displayed on their own screen. To the right in the list of users, you can click the mouse icon next to everyone, so they have access to your computer and control your mouse.
- Video transmission: Click on the camera symbol at the top, the option below to switch on your webcam opens up. Once this has been done, the other users are also invited to activate their webcams.
- Telephone call: You can use the headphone symbol to have TeamViewer start a telephone conference. Simply call the number displayed and a conference call will be set up. Anyone who enters their conference PIN when they call will be automatically added. However, this conference costs 14 cents per minute.
- VoIP call: On the other hand, a call over the Internet is free. Just click the headset icon. You can also mute individual users in the participant list.
- Chat: If you click on the symbol with the speech bubbles at the top, the chat opens at the bottom. Here all users can communicate with each other.
Step 4: Additional features in the meeting
- File box: If you click on the symbol with the two documents, a small drag-and-drop area will open at the bottom, into which you can drag any files in order to share them with your partners.
- Whiteboard: The whiteboad function opens with the brush. So you can paint, draw and write on your screen.
- Screen transmission: Via this point you can record the current transmission and only transmit certain parts of the screen to the participants. This makes it possible, for example, to transmit only one program such as Powerpoint.
In this guide, we show you how to perform remote control with TeamViewer.